
Tuscarora RR #6

Oh, the ubiquitous LGB mogul. First introduced in the mid 1980s, it was the first true US-prototype locomotive made by LGB. As a result, pretty much everyone who was modeling large scale at the time bought one (or two, or three...) It has been a staple of LGB's product line-up ever since then, being produced in at least two different styles (1880s above, or a more modern 1920s version with round domes and coal load), and color schemes too numerous to mention. It's next to impossible to find a large scale modeler who doesn't have one of these locos.

To LGB's credit, they did a very good job on the model (though that red boiler, ugh!) It scales out very favorably to the Denver, South Park & Pacific prototype in LGB's stated scale of 1:22.5. At that scale, the track gauge scales to 1 meter (39.4") If you're modeling 36" gauge on the same 45mm track, the scale works out to be 1:20.3. Therein lies the genesis of Tuscarora RR #6.
I have had more than one person who is modeling 1:20.3 tell me they were selling their LGB mogul because it was "the wrong scale," thus unsuitable for their railroad. (Some more emphatically than others.) If you've been reading my blog for any time, you know I'm something of a student of narrow gauge equipment, particularly when it comes to size. If there's one truth to narrow gauge railroading, there's no such thing as "too small." So, germinating in the back of my mind for quite some time has been the notion to take an LGB mogul and "upscale" it to 1:20.3--without doing a thing to it, just to illustrate that point.
Now, here begins something of a conflict for me. Because the LGB mogul has been so wildly popular, it seems to be omnipresent on pretty much any railroad one visits. I cuts against the grain for me to have a loco that "everyone" has, so I can't very well just take a stock mogul, put a fresh coat of paint on it, stick a slightly larger figure in the cab, and call it good. It's still going to look LGB mogul-ish to me. At the same time, my usual way of disguising an otherwise widely-recognized model is to change the cab, give it a new tender, or other significant cosmetic changes. That normal course of action runs afoul of my desire to do as little cosmetically as possible to show the stock mogul fits in very well with 1:20.3 equipment. So, the search for a middle ground began...

Enter Waynesburg & Washington RR #4. The W&W ran in southwestern PA, and operated a fleet of moguls. Drawings for this loco are published in "Three Feet on the Panhandle." When I compared the overall dimensions of this loco to the LGB mogul measured in 1:20.3, I discovered the two were nearly the same size. Critical dimensions I was looking at were the height from the rail to the top of the cab, and from the tender deck to the top of the cab--places where humans have to be able to move around. Those were nearly identical matches. (In fact, the LGB cab measures 4" wider than the W&W prototype.) The tender is virtually spot on as well. Pretty much all of the major measurements (length, width, height, wheelbase) were within 3".
There are some (significant) differences, most notably the drivers. The W&W loco rode on 41" diameter drivers, whereas the LGB mogul's drivers scale to 36". The boiler on the W&W loco is slightly narrower, and also straight, where the LGB boiler has a slight taper on the middle course. The domes are also in different places.
There's nothing one can do about the drivers, and changing the boiler to match the prototype would violate the "do nothing to it" principle of the project. That, and the slightly larger boiler offsets the slightly smaller drivers, so it's kind of a wash there. Excluding those two things, the task became to turn the LGB mogul into a model based on W&W's #4.

After a few months' worth of on-and-off work, this is what I ended up with. The biggest change to the overall loco was extending the smokebox and moving the cab back to give more room behind the backhead per the prototype.

Here's the mogul next to my C-19. It's actually not that much smaller in terms of overall size. Shorter, definitely, because it's got one less driver. but beyond that, there's not a whole lot of size difference.

The extended smokebox came off of a surplus Bachmann 4-6-0. It was a little smaller in diameter than the mogul smokebox, so I put a small filler piece of styrene in the bottom of it to spread it out.
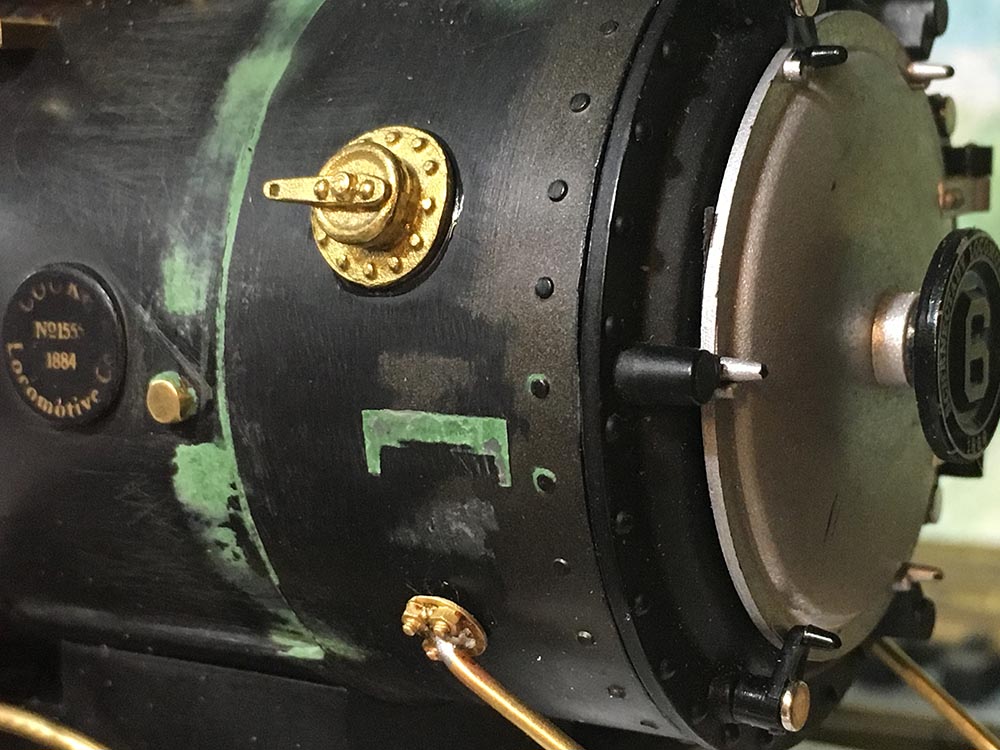
The completed smokebox extension, installed on the original. The bolt is one of four which holds the smokebox extension onto the original, with the joints filled in with green putty.

Here's a shot inside the smokebox, shopping the styrene spacers which hold the smokebox door in place, and also the speaker, one of two that are installed inside the boiler. There was a lot of space inside this boiler, so I figured I'd mount the speakers inside so the sounds come from the locomotive itself as opposed to the more typical placement of having the speaker in the tender. The green clay acts as a sealer for the speaker mount.

The old style cowcatcher was not going to work for the era I'm modeling, so I built a new pilot beam. The cowcatcher itself is surplus from a Bachmann 4-6-0. I have a fair number of these in my parts box, and it allows me to give my locos something of a family resemblance with them all having similar-style cowcatchers.

A slightly higher view of the pilot, showing the wider pilot deck, new boiler stays, and air line. (Hose to be added after the loco is painted.)

Cylinder lubricator lines added to the tops of the cylinders, along with snifter valves (bottom right corner)

The original smokestack was not going to work with this model. This one came from a Bachmann C-19, with a new flange added to the base of the LGB smokebox. The stack is just a press fit, so in the event it hits a low-hanging bridge or tree branch, it will just pop out and avoid damaging the loco.
 I went back and forth on the headlight. I liked the older box-style headlight, and it matched the prototype, but I felt a more modern look would set this loco apart. I've got a bin full of Bachmann headlights, so (again) it gives a "family" look to the fleet of locos. (Even though historically, headlights varied greatly from loco to loco on any given roster, so the "family" argument with respect to headlights is more modeler's license than based on prototype practice.) Who knows--I may still change my mind on that. I also drilled out the stock handrail stanchions, and bent new brass handrails that run around the front of the loco, right under the headlight bracket. Often, the wires for the headlights were run through the handrails, so I didn't bother running anything that looks like conduit.
The LGB mogul had the sand lines molded into the boiler itself. I removed them and replaced them with new sand lines bent from wire. I have not put the boiler bands back in place on the model yet. They'll be added once the painting is complete.

The original steam dome was (to my aesthetic sense) too narrow. So I covered it with a steam dome off of a Bachmann 4-6-0. I thought about replacing the forward dome as well, but I liked the contrast. If a locomotive was in a wreck, it was common for domes to be replaced with whatever was on hand as opposed to what would have been "original." This gives the locomotive a little bit of a visual backstory.

The cab was moved back about 3/4" to make more room in the cab for the crew. This necessitated a new boiler jacket section on the back. I also extended the running boards. The LGB running boards (as well as those on the prototype) tapered in a little bit about halfway down the running boards. I decided to keep them the same width along the entire length. It does add a bit of visual weight to the loco, but it's more for crew safety. A new air pump and plumbing complete the side of the boiler.

A new generator will provide power for the lights. (scrap box surplus)

More random details. I'm not 100% sure what this would have been on the prototype; some kind of air reservoir for the brakes or something near as I can tell. It looked cool, though. A little more modeler's license. While in this section, I replaced the stock air brake cylinders with slightly larger ones from my scrap box. Apparently my brake arm got pushed a bit forward. It probably shouldn't be rubbing against the wheel tread.
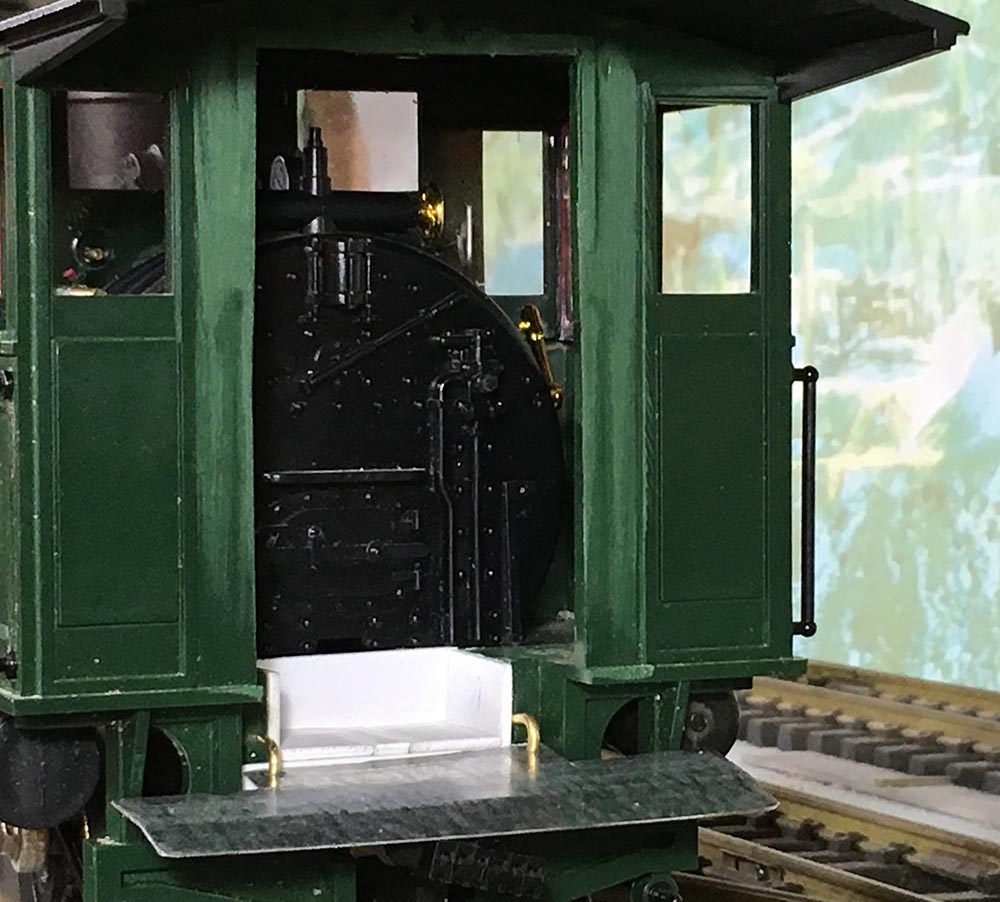
I mentioned I moved the cab back a little bit to give the crew some more room behind the backhead. This meant opening up the back of the stock cab. I didn't (and likely will not) go too crazy on the cab interior detailing. I'll have an engineer sitting on the engineer's side, and the fireman will likely be standing right behind the boiler.

I made a deck plate to go between the loco and tender. Can't have my crews falling onto the tracks, even if they are plastic. I also cut off those weird walls that extended from the front of the tender tanks. I'm not sure what they were supposed to represent. My guess is that they were a concession by LGB to bring the tender visually closer to the locomotive, but they went all the way to the front of the tender deck, so the crew couldn't actually get into the loco! Well, they're gone now, so our crews have free and ready access.

I didn't do a whole lot to the tender, but made some minor tweaks. First, the toolboxes were in dire need of wood grain, so I availed myself of a razor saw and sandpaper. I also made new water shut-off valves for the ends of the tender tank. Styrene half-round strip creates a finished look to the edge of the flange along the tender side.

I went back and forth on where to mount the back-up light on the tender; even if I wanted one at all. I figured for the era I'm modeling this loco to represent (20s - 30s) it would have electricity, so the crews would likely have easily installed a light on the back of the tender. I didn't want to make a tall stand to put on the back of the tender next to the water filler. In the end, I did what I figured any reasonable railroad shop crew would do--go digging through their spare parts bin to find something that worked. I found this headlight bracket and mounted it to the hungry boards on the tender. Voila! Instant tender light mount! In hindsight, I probably could have mounted it on the other side so it's not blocking the engineer's view to the back. I may still change that. I can't center it--it sticks out too far to where it would interfere with the water hatch opening.

The back of the tender looked a little empty, so I found a toolbox to sit under the rear air tank. I thought about taking the air tank off, but I don't have a whole lot of air storage capacity on the loco--just an identically-sized tank under the fireman's side of the cab, so I figured crews would appreciate having enough air to do something silly like stop the train.

The rear coupler is an Accucraft 1:32 coupler. I'll have a chain dropping from the cut lever to the pin so it will become operable. (The front coupler is a Kadee #1 scale coupler because of the draft gear I had to use. The hose for the air brake will be added once the loco is painted.

Here's a look inside the tender. Battery, fuse, Tsunami2 control board (motor, lights, sound), and Tam Valley Depot wireless receiver. This receiver works with the Airwire throttles.

That's where things stand for the moment. Painting will come later in the Spring once the weather warms up. I haven't entirely made up my mind which paint scheme I'm going to use on this loco--whether I'm going to go with the planished iron boiler jacket with black cab and tender and gold lettering, or the later dark green boiler jacket with black cab and tender and silver lettering. But I've got a few months to work that out.
posted by Kevin Strong | 18:46
![]()
2 Comments:
Fantastic article! Could you provide more insight installing speakers in the boiler? I assume they are face down with slits cut out?
Any updates with paint yet?
Best,
Wes
Thanks! The front speaker can be seen in the 7th (?) photo from the top. You're seeing the back of it, sealed in place with modeling clay as a sound barrier. It's facing the back of the boiler, but is mounted forward of the smokestack, so the sound can travel through that as an "exit."
The rear speaker, if I recall, is similarly mounted in the firebox area.
The finished loco can be seen in the next post, called "Little 6." Here's a link:
http://tuscarorarailroad.blogspot.com/2018/09/little-6.html
Post a Comment
All comments will be moderated prior to posting.
Subscribe to Post Comments [Atom]
<< Home